
openweathermap을 사용해서 기온을 가져오는 것까지 완료했다.
그럼 이제는 이모티콘을 사용해서 날씨를 나타내 줄 차례!
(기온을 제외하고, cloudy, misty, sunny 등 날씨를 표현하는 단어..! 대기 상태라고 하나요,.?)
먼저 data속의 weather를 찾아보자.
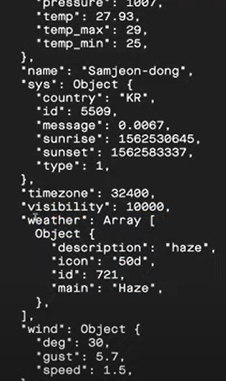
날씨는 저렇게 weather 배열 안, 첫번째 object의 main에 있다 ("haze" 부분)
해당 부분을 가져오기 위해서는, temp를 가져왔던 것처럼 data.weather[0].main을 가져오면 되는 것!
export default class extends React.Component {
  state = { isLoading: true };

  getWeather = async (latitude, longitude) => {
    const { //1. data를 불러와서 그 안의 main 부분의 temp를 가져와 temp에 저장해주고,
    // data 밑의 weather는 배열이기 때문에 해당 배열을 통째로 가져와준다.
      data: {
        main: { temp },
        weather,
      },
    } = await axios.get(
      `http://api.openweathermap.org/data/2.5/weather?lat=${latitude}&lon=${longitude}&appid=${API_KEY}&units=metric`
    ); // 쌍따옴표, 홑따옴표 아니고 1 옆에 있는 백틱 ` 을 사용. 그래야 안에 변수 넣어줄 수 있음
    this.setState({
      isLoading: false,
      temp,
      condition: weather[0].main, //2. 그 후 이렇게 condition에 넣어주고,
    });
  };
  getLocation = async () => {
    try {
      await Location.requestPermissionsAsync();
      const {
        coords: { latitude, longitude },
      } = await Location.getCurrentPositionAsync();
      this.getWeather(latitude, longitude);
      // Send to API and get Weather!
    } catch (error) {
      Alert.alert("Can't find you.", "So Sad");
    }
  };
  componentDidMount() {
    this.getLocation();
  }
  render() { //3. 렌더로 weather로 넘겨주는데, 여기에도 condition을 추가해줘야겠지!
    const { isLoading, temp, condition } = this.state;
    return isLoading ? (
      <Loading />
    ) : (
      <Weather temp={Math.round(temp)} condition={condition} />
    );
  }
}
노마드 코더에서는 해당 단어를 표시해주지 않는데, (이후에 표시하는 듯.)
나는 미리 추가해보기로 했다.
//Weather.js
import React from "react";
import { View, Text, StyleSheet } from "react-native";
import PropTypes from "prop-types";

export default function Weather({ temp, condition }) { //여기에도 condition 추가!
  //stateless component로 만들기.
  return (
    <View style={styles.container}>
      <Text style={styles.temp}> {temp}º</Text>
      <Text style={styles.temp}> {condition}</Text> //아~주 간단합니다.
    </View>
  );
}

Weather.propTypes = {
  temp: PropTypes.number.isRequired,
  condition: PropTypes.string.isRequired, //여기 condition isrequired라고 표시도 해주자!!!!!!!!!!!
};

const styles = StyleSheet.create({
  container: {
    flex: 1,
    justifyContent: "center",
    alignItems: "center",
  },
  temp: {
    fontSize: 42,
  },
});
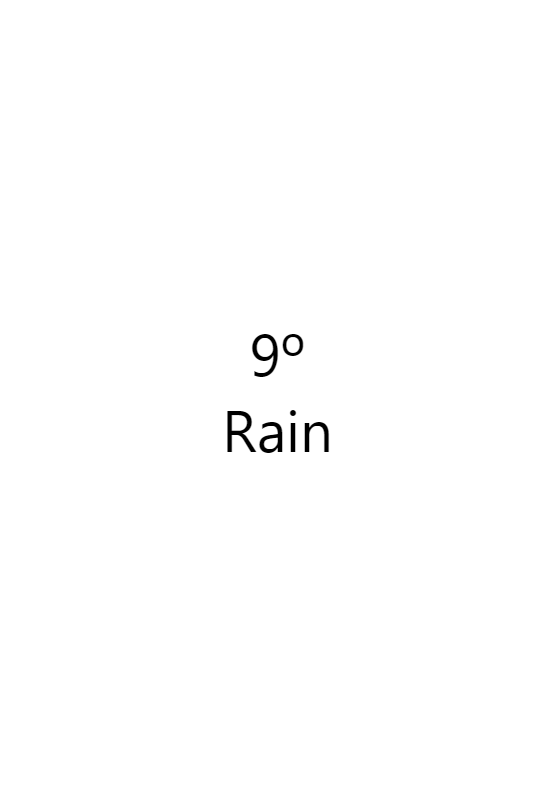
아주 간단하게 한 줄만! 추가해줬더니 아주 잘 뜬다.
이번에는 이모티콘을 추가할건데!
노마드코더에서는 MaterialCommunityIcons를 사용한다.
expo에서 제공하는 vector icon 중 하나 같은데......
(벡터 아이콘이기 때문에 사진과는 달리, 아무리 확대해도 깨지지 않는다는 장점이 있음!)
import { MaterialCommunityIcons } from "@expo/vector-icons";
//import 방법

 <MaterialCommunityIcons
   size={96}
   name="weather-rainy"
 ></MaterialCommunityIcons>
//사용방법


//weather.js 에 추가해주자.
이런식으로 사용하면 된다고 한다.
내 위치는 비가 내리고 있어서, 해당 표시를 name으로 해줬다.
이 부분은 나중에 (바로 다음에?) 가져온 날씨를 토대로 바뀌게 만들 예정이다.
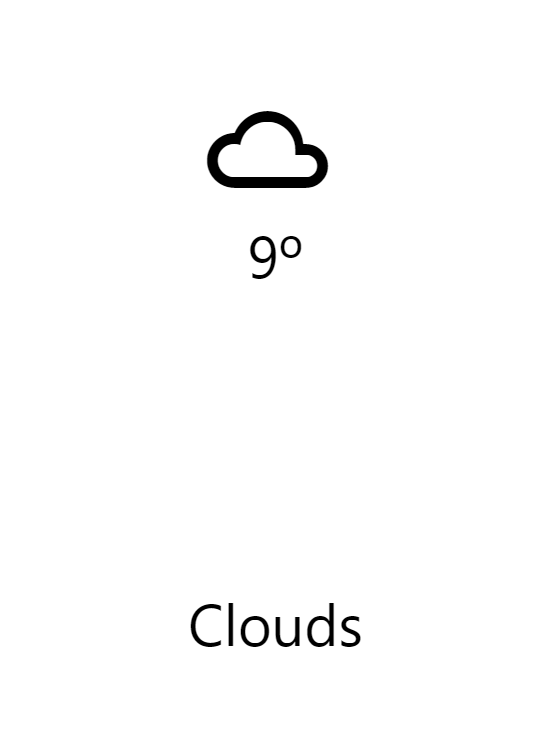
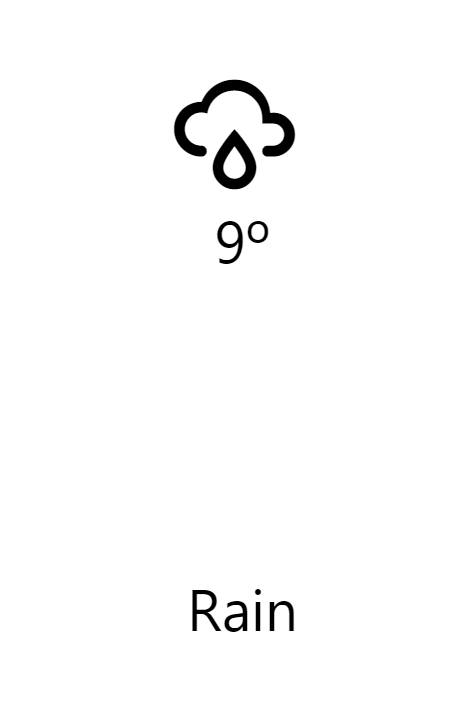
그렇게 해서 완성된 모습!
나름 기온도 뜨고 날씨도 뜨고 이모티콘도 뜬다.
배경에 색감을 추가하고, 현재 위치와 시간도 추가하면 딱 좋겠다. (이건 노마드 코더에서 다룰 부분!)
그리고 위치를 바꿀수도 있게하고 싶고, 여러 위치를 추가해서 저장해서 화면을 넘기며 볼 수 있으면 좋겠고(기존 아이폰 날씨앱처럼.)
미세먼지 농도도 가져올 수 있게 하고 싶고, 밤낮에 따라 테마가 라이트/다크모드로 변화했으면 좋겠다.
(이건 내 바람.... 가능하려나?)
일단 오늘은 여기까지!😉
'Study IT > Web-App' 카테고리의 다른 글
| [React] 간단한 날씨 웹앱 만들어보기 - 내 위치의 날씨 가져와서 화면에 표시하기(1) (0) | 2021.04.27 |
|---|---|
| [React] 간단한 날씨 웹앱 만들어보기 - openweathermap 에서 날씨 API 가져오기, axios 사용 (0) | 2021.04.26 |
| [React] 간단한 날씨 웹앱 만들어보기 - Loading.js 와 Location (0) | 2021.04.12 |
| [React] 간단한 날씨 웹앱 만들어보기 - React Native, Expo (0) | 2021.04.04 |
| [React] 간단한 웹-앱 만들기 - 기본 문법 공부 (1) (0) | 2021.02.15 |


댓글